I recently installed Ubuntu on my PC. I wasn’t too familiar with it. I mean I had heard its name once or twice but I used to think that its just some software. Never really imagined that it’s gonna be a complete operating system. I really l
iked Linux when I saw it for the first time. I mean everything was so speedy and quick about it. But then I came to know about the reason why it isn’t as popular as Windows. The reason was simple. It just doesn’t have enough apps. There are really very less apps for Linux as compared to Windows. Other than that I couldn’t find any other problem with it. Everything was going on fine till the time I tried playing some music files. That’s when I realised that I have all my data and media files in the Windows partition. To access my data I had to restart my PC and then log onto Windows, which is a pretty long process. Now, if you’re an impatient person like me, it can get pretty irritating if you have to do this again and again for all the files you want to access while you’re in the other partition. Copying all my data to the other partition is one of the options to solve this problem but with the specs on my P
C, it’s going to take days. And plus the same data will be saved on your hard disk twice which is gonna waste a lot of storage space. What I needed was a quick and easy solution. And that’s when I found out about some pretty easy methods to access one of the partitions on your hard disk from the other one. Here are a few of them…..
Accessing NTFS from ext4 (Or Windows from Linux)
You just need to follow a few simple steps and then you’ll be able to access the files in Windows from Linux.
1) Open the terminal window in Linux (that’s alt+c
trl+t if you don’t know).
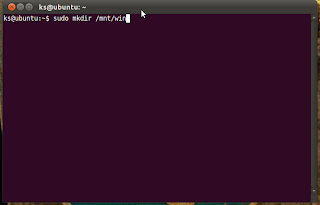
2) We need to create a directory that will link to the other partition. For those of you who didn’t notice the heading, we are using Windows as the second partition.
Write the following command in the terminal window-
sudomkdir /mnt/win
It’s gonna ask for your password so just typ
e in your password when it does.
The commands are case sensitive so don’t go writing in capitals.
3) Then we need to mount the Windows drive and link it to the new directory we just made.
Write the following in the terminal window to do so-
sudo mount -t ntfs /dev/sda5 /mnt/win

Type in your password when it asks you to do so.
What mount command basically does is that it attaches an additional filesystem to the currently accessible filesystem on the computer.
Use ‘sda5’ if you want to access your D: drive. But if u want to access your C: drive you have to replace ‘sda5’ by ‘sda1’.
And voila!!! You’re done. To check out the results go to the directory we just made by entering the following command-
cd /mnt/win

And then enter the following command to view all the contents-
ls

Just by following these simple steps you can save tons of time that you would have wasted restarting your PC again and again and again and again and…….. you get my point. ;)
Accessing ext4 from NTFS (Or Linux from Windows)
The problem with Windows is that it doesn’t recognise ext2, ext3 or ext4 file systems that are usually used in Linux. To solve this problem we have to do something to make the ext formats recognisable to Windows so that the Linux files can be accessed. One of the ways, which I’m going to show you, is by installing a software. There are a lot of softwares for this purpose. The one that I’m gonna use is ext2explore. You just have to install this software in your Windows and then you can easily access all the data in Linux from Your Windows partition.
Just follow these few simple steps-
1) Download the ext2eplore software and install it.
2) Run the application as the administrator.
3) And that’s it. Now you can access all your data in Linux.

Accessing HFS+ from ext4(or MacOS from Linux)
Accessing Linux from windows is pretty much the same as accessing Windows from Linux. Most Linux distributions come with a driver to read (and optionally write to) HFS+ volumes. The driver is called hfsplus and you can use it by following these simple steps-
1) Open the terminal window in Linux.
2) Just like for Widows, we need to create a directory that will link to the other partition.
Write the following command in the terminal window-
sudo mkdir /mnt/mac
Type in your password when it asks you to.
3) Now we’ll use the mount command to link the mac partition to the directory we just made.
sudomount –t hfsplus /dev/sdb1 /mnt/mac
The volume name will be sdb1 or sdb2 or something else depending on the configuration of your machine.You can see the exact name on your system by using the fdisk –lcommand. That’ll show you a list of all the drives connected to your system.
Accessing ext2/3 from HFS+ (or Linux From MacOS)
Making your computer able to access ext2 format from hfs+ actually takes a lot of time. But I’m sure you’re gonna be satisfied with the end results. Following are the instructions you need to fallow-
1) Download the latest MacFUSE binaries (MacFUSE-2.0.3.2.dmg) from the website at: http://macfuse.googlecode.com/.
2) Mount the MacFUSE-2.0.3.2.dmg volume and install the MacFUSE package by double clicking its icon (MacFUSE.pkg).
3) After the installation download the latest Fuse-ext2 binaries (fuse-ext2-0.0.5.dmg) from the website at: http://sourceforge.net/projects/fuse-ext2/.
4) Also mount the fuse-ext2-0.0.5.dmg volume and install the fuse-ext2 (fuse-ext2.pkg).
5) Now that both packages are installed it's time to mount our external drive containing the ext partition. And in order to mount any (or all) of them we need to find out what their device name is. This can most easily been done by launching Disk Utility from the Utilities folder under Applications. In the left column you should see your hard drive and the names of the partitions it contains.
6) In our case we would like to mount disk2s1 (highlighted in the screenshot above).We need the Terminal application to do this, which is located under Applications.
7) After you launched Terminal app we will create a new directory which will be the mount point for the partition on the drive. Once that's done we can use the fuse-ext2 command to actually mount the drive name mentioned above to the mount point.
mkdir /Volumes/Linux
fuse-ext2 /dev/disk2s1 /Volumes/Linux

8) Congratulations! Your external drive should now be visible in the Finder.
Pics for this part taken from ekkettoz.blogspot.com/2009/06/mounting-linux-ext2ext3-partitions.html
Accessing NTFS from HFS+ (or MacOS from Windows)
There are a lot of ways to do this. The one that I’m gonna show you now is by installing a software. It becomes pretty easy after you have installed the software. The software that I’m gonna use is Paragon ntfs (Paragon’s the name of the company by the way). You just have to install this software into your Mac and all the ntfs partitions will be mounted automatically. The interface is pretty user friendly.
And voila!!! Now you can access, read and write your ntfs partition and all its files from hfs+.

Pic from ntfs-for-mac-os-x.soft32.com
Accessing HFS+ from NTFS (or MacOS from Windows)
Accessing hfs+ from ntfs is pretty much the same as accessing ntfs from hfs+. I will again use a software to do it. And that too from the same company. I’m gonna use paragon hfs+ for this. Installing these softwares makes it pretty easy for us coz then we don’t have to manually mount the drives. Once you’ve installed the software its child’s play from there on. The user interface is again user friendly so I don’t think you’ll face any kind of problem.


Pics taken from www.paragon-software.com
Thanks
Thanks to all the people who viewed this, to Google for helping me out with all the material and stuff and a special thanks to Amarjeet sir who gave us this unique opportunity and this even more unique concept and welcome to all those who found this useful.
Cheers!!!!
By-
NiswarthSinha
&
Abhishek Singh
No comments:
Post a Comment