Friday 7 October 2011

Creating A Website Using Drupal


GETTING STARTED WITH DRUPAL


To begin with drupal we need to follow certain steps :-

1. Download a localhost server(I have used wamp server). To download wamp server : http://www.wampserver.com/en/download.php
2. Install the server in your pc.
3. Download drupal - 7.8 files in your system from http://drupal.org/download
4. Move the folder containing drupal files to ”C:\wamp\www\”
5. Open the link http://localhost/drupal-7.8 .
6. Installation will start and it will ask database name.
7. Now, go to http://localhost/phpmyadmin and create a new database.
8. Give database name at http://localhost/drupal-7.8  as your database name, path as root, database server as localhost and no password.
9. Enjoy using drupal.


How to Create Website

Open the following link:- http://localhost/drupal-7.8  and log in with your username and password.
Drupal provides the administrator with a special administration toolbar.


This toolbar has the following links:-
  • Home – It displays the home page of your website.
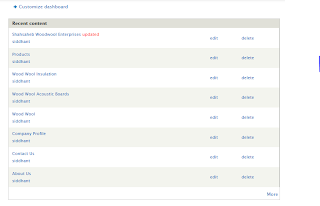
  • Dashboard – It provide brief description of pages added in the site.

  • Content
    • Add Content
    Two kind of pages are allowed basic page and article. Basic Page - Every page as a link in site is a basic page. We can give direct link from home page or pages within pages. Article - It is posted on home page as well as a linked full page is created. It is like posting a new article every now and then.
    • Find Content - All pages already made are available to edit.
  • Structure –
    • Block – provides detail of different blocks on home page.

  • Modules – The website is divided into several modules which can be enabled or disabled from here.

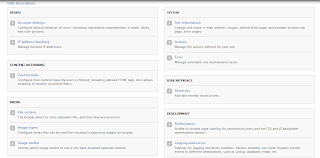
  • Configuration – It helps in changing several important basic elements.


For more information log on to http://drupal.org/documentation


Our Website

For my website I followed certain steps :-
1.   1. Firstly, we selected a theme from http://drupal.org/project/Themes  .
Our theme is Danland.
2.   2.Then, in our theme a slideshow was given so we changed the images present in the slideshow in accordance with our website.
3.   3. We added basic pages of About Us, Products, Contact us etc.
4.   4. Content of basic page was taken from the website provided by sir, and then edited by html and then included in the basic pages.
5.  5.  Internal links for product was provided by making a superfish menu (drop down menu).
6. 6.Article is inserted on home page.
By :  Siddhant Jain and Sahil Dhanda

Tuesday 4 October 2011

BOOT LOADER AND ITS OPTIONS

       BOOT LOADER

It’s a piece of code that runs as you switch on your computer. Each operating system has a set of boot loaders specific for it. It contains several ways to boot the operating system kernel. It also contain commands for debugging and modifying the kernel environment

Types of boot loader:
1.  GNU GRUB (GNU Grand unified boot loader):It provides a user to choose to boot one of multiple operating systems installed on a computer. And also to select a specific kernel configuration available on a particular operating system’s partitions.


2.  LILO (Linux loader): It can boot an operating system from floppy disk and hard disks. It can be placed in the master boot record (MBR) or the boot sector of a partition.


3. BOOTMGR: It reads the boot configuration data and displays an operating system selection menu. You can access the BOOTMGR by pressing the space bar key .
 4. NTLDR (NT loader): It allows the user to choose                                  b/w the operating system. It allows user to pass pre-configured options to the kernel. Menu options are stored in boot.ini, which itself is located in the root of the same disk as NTLDR.
                                    GNU GRUB
To install grub:
 1.Type “ sudo apt-get install grub2” in the terminal and press enter.


2. Then type your password and press enter.
3. Then type “y” and press enter.


4. Then you will come to this :


5.Now type “sudo reboot” and press enter.


6. Your grub install successfully.


                            BOOTMGR IN WONDOW 7
1. Insert window 7 dvd in to your dvd drive and restart the computer.
2.  Then press any key when windows asks “press any key to continue”.
3.  Then select your language and click next.
4.  Then select “repair your computer”.
5.  It will search for the installation directory, once 
it finished, click “next”.
6. Select “startup repair” in recovery tools.
7.  By doing this window will try to repair your startup problems and gives a message to restart your system.
8. Your bootMGR is successfully installed.

 DIFFERENT OPTIONS IN THE BOOT LOADER


Monday 3 October 2011

SERIAL PORT COMMUNICATION

Serial communication is a popular means of transmitting data between a computer and a peripheral device such as a programmable instrument or even another computer. All computer operating systems in use today support serial ports, because serial ports have been around for decades. Parallel ports are a more recent invention and are much faster than serial ports. USB ports are only a few years old, and will likely replace both serial and parallel ports completely over the next several years.

The name "serial" comes from the fact that a serial port "serializes" data. That is, it takes a byte of data and transmits the 8 bits in the byte one at a time. The advantage is that a serial port needs only one wire to transmit the 8 bits (while a parallel port needs 8). The disadvantage is that it takes 8 times longer to transmit the data than it would if there were 8 wires. Serial ports lower cable costs and make cables smaller.

Before each byte of data, a serial port sends a start bit, which is a single bit with a value of 0. After each byte of data, it sends a stop bit to signal that the byte is complete. It may also send a parity bit.

Serial ports, also called communication (COM) ports, are bi-directional. Bi-directional communication allows each device to receive data as well as transmit it. Serial devices use different pins to receive and transmit data -- using the same pins would limit communication to half-duplex, meaning that information could only travel in one direction at a time. Using different pins allows for full-duplex communication, in which information can travel in both directions at once.

Figure 1: 1: RS-232 Instrument,2: RS-232 Cable, 3:Serial Port

Serial communication requires that you specify the following four parameters:

  • The baud rate of the transmission
  • The number of data bits encoding a character
  • The sense of the optional parity bit
  • The number of stop bits

Each transmitted character is packaged in a character frame that consists of a single start bit followed by the data bits, the optional parity bit, and the stop bit or bits. The figure below shows a typical character frame encoding the letter m.


Serial ports rely on a special controller chip, the Universal Asynchronous Receiver/Transmitter (UART), to function properly.

The external connector for a serial port can be either 9 pins or 25 pins. Originally, the primary use of a serial port was to connect a modem to your computer. The pin assignments reflect that. Let's take a closer look at what happens at each pin when a modem is connected.


9-pin connector:

1. Carrier Detect - Determines if the modem is connected to a working phone line.

2. Receive Data - Computer receives information sent from the modem.

3. Transmit Data - Computer sends information to the modem.

4. Data Terminal Ready - Computer tells the modem that it is ready to talk.

5. Signal Ground - Pin is grounded.

6. Data Set Ready - Modem tells the computer that it is ready to talk.

7. Request To Send - Computer asks the modem if it can send information.

8. Clear To Send - Modem tells the computer that it can send information.

9. Ring Indicator - Once a call has been placed, computer acknowledges signal (sent from modem) that a ring is detected.

25-pin connector:

1. Not Used

2. Transmit Data - Computer sends information to the modem.

3. Receive Data - Computer receives information sent from the modem.

4. Request To Send - Computer asks the modem if it can send information.

5. Clear To Send - Modem tells the computer that it can send information.

6. Data Set Ready - Modem tells the computer that it is ready to talk.

7. Signal Ground - Pin is grounded.

8. Received Line Signal Detector - Determines if the modem is connected to a working phone line.

9. Not Used: Transmit Current Loop Return (+)

10. Not Used

11. Not Used: Transmit Current Loop Data (-)

12. Not Used

13. Not Used

14. Not Used

15. Not Used

16. Not Used

17. Not Used

18. Not Used: Receive Current Loop Data (+)

19. Not Used

20. Data Terminal Ready - Computer tells the modem that it is ready to talk.

21. Not Used

22. Ring Indicator - Once a call has been placed, computer acknowledges signal (sent from modem) that a ring is detected.

23. Not Used

24. Not Used

25. Not Used: Receive Current Loop Return (-)

Voltage sent over the pins can be in one of two states, On or Off. On (binary value "1") means that the pin is transmitting a signal between -3 and -25 volts, while Off (binary value "0") means that it is transmitting a signal between +3 and +25 volts...

Managing Serial Ports in Windows

USB Cables and Connectors

Connecting a USB device to a computer is simple -- you find the USB connector on the back of your machine and plug the USB connector into it.

If it's a new device, the operator system auto-detects it and asks for the driver disk. If the device has already been installed, the computer activates it and starts talking to it. USB devices can be connected and disconnected at any time.


Discovering External Serial Ports

To check which all serial ports are connected to the computer, go to Start Menu


Then click on Devices and Printers and then select any one and view its properties.


Now to discover an External Serial Port, go to Control Panel and then select DEVICE MANAGER.

You will find a list which will have information about interfaces, biometrics, Disk Drives and COM & LPT ports as well.


Expand COM Ports option and right click on any of the serial port connections and view its properties.

In my case I have joined my SAMSUNG android phone to my computer.


You can also fiddle with its parameters in port settings by changing its Baud Rate, Data Bits, Parity and Stop Bit which will change the device’s behaviour or performance.


Click on Advanced and it will show Receive and Transmit buffer and also to which COM port it is joined to. You can also change its COM number.

LINUX

Linux offers various tools. Linux uses ttySx for a serial port device name. For example, COM1(DOS/Windows) is ttuS0, COM2 is ttyS1 and so on ...

Finding serial ports

Serial ports appear in Linux as device files, which means you can access them

conviniently with same command as e.g. text files.

1. Normal serial ports appear as /dev/ttyS#, so first is /dev/ttyS0, second

/dev/ttyS1 and so on.

2. USB to serial adapters should work out of the box (from kernel 2.4 on I think)

without any extra drivers and they appear as /dev/ttyUSB# ie. /dev/ttyUSB0

2 Serial port settings

Serial port settings can be changed using stty command. (See ”man stty”)

Example: Set serial port /dev/ttyS0 baud rate to 57600 and odd parity

stty -F /dev/ttyS0 57600 parodd

3 Reading from and writing to serial port

You can send commands to serial port using command echo:

echo "command" > /dev/ttyUSB0

And read data from serial port using cat :

cat /dev/ttyUSB0

redirect output to a file:

cat /dev/ttyUSB0 > file.txt

Task: Display Detected System's Serial Support

Simple run dmesg command
$ dmesg | grep tty


setserial command

setserial is a program designed to set and/or report the configuration information associated with a serial port. This information includes what I/O port and IRQ a particular serial port is using, and whether or not the break key should be interpreted as the Secure Attention Key, and so on. Just type the following command:
$ setserial -g /dev/ttyS[0123]

setserial with -g option help to find out what physical serial ports your Linux box has


If Setserial is not installed then one can type

$ Sudo apt-get install setserial

Get it installed and then can further perform functions

Linux serial console programs

Once serial ports identified you can configure Linux box using various utilities:

1. minicom- The best friendly serial communication program for controlling modems and connecting to dump devices

2. wvidial or other GUI dial up networking program - a PPP dialer with built-in intelligence.

3. getty / agetty - agetty opens a tty port, prompts for a login name and invokes the /bin/login command.

4. grub / lilo configuration - To configure serial port as the system console

The following are further few commands to search whether ur ports are empty or not:


$Cd /dev

$ls

$cd bus

$ls

$usb

$ls

at last type $cd XX (your port number)


By

Aakash

Ankit Kumar

We hope it was easy to understand .

SECURE FILE TRANSFER PROTOCOL

SECURE FILE TRANSFER PROTOCOL
Today , we are all connected through the technology … Every moment , we are sharing some or the other sort of information . This information we share is often meant to be restricted to a select group of individuals . Even in computers , we tend to share various files , we log into our e-mail accounts through passwords which are sent over the internet and we use online banking for various money transactions . What if such sensitive information ended up getting into the wrong hands ? What if this information is misused to our loss ? … This blog attempts to cover certain aspects of secure file transferring which helps us prevent sensitive data from getting into wrong hands through a secure file transferring protocol.
DEFINITIONS OF SOME BASIC TERMS:
Let us start by defining what we mean by protocol .
PROTOCOL basically means a set of instructions to be followed when communicating .
As we have an algorithm for mathematics or for a computer program, or a recipe for a dish , the same way , we have a protocol for communication .
There are a number of softwares for actually setting up , initiating and for working in case of a protocol . These are :
1) Network protocol
2) USB PROTOCOL
3) Computer-compute protocol
So we now come to the question … what is a file transfer protocol ?
File transfer protocol is a standard network protocol used to transfer files from one host to another over a TCP ( transmission control protocol ) based network such as “ internet “ . It is considered a safe kind of communication for transfer . During its initial days , it was used in command line mode , using standard commands and syntax , but now due to the advent of technology , even GUI( graphical user interface) based FTP are possible .
So … let us now see what SFTP is … SFTP , or Service File Transfer Protocol (or may be called as Secure FTP or SSH-FTP ) , is an interactive mode of file transfer protocol similar to FTP . The difference between FTP and SFTP is that the SFTP is latest and is more secure than the normal FTP . It’s just like a younger and stronger security guard making sure that what needs to be secure remains secure .
We also have SSH , a short form for Secure Shell , which is basically a way you can share data safely over an unsafe network .
SSH is like an air conditioner , keeping the temperature warm even in the presence of the immense heat of the wrong-doers willing to pounce onto your data to put it to some wrong use J .
Now you may ask … what is the difference between SCP and SFTP ?
The answer would be simple . SCP only allows transfer of files but SFTP is latest thing available and allows multiple operations on a file . SCP is basically used on linux platform whereas SFTP is used in a wide range of platform , when you want to upload a less number of file (something around 2 or 3) SCP is better as there is no use of setting up an SFTP connection for just a few files as for what I have discovered is that the SFTP is not easy to setup…
SETTING UP SSH SERVER
So … the question that you must be asking is … how do u set up an SSH server to put it to use ?
In LINUX SSH is basically a linux command only so there is no problem setting up an SSH server on linux , its just a matter of installing a package called SSH secured package or SSHD . You can get this from Ubuntu Software centre or typing a command ‘apt-get install sshd’ or “apt-get install ssh server”.
After this in the terminal…type the following command to execute a connection between the two pc’s:
>>>ssh username @ipaddress (here username refers to the name of the user in whose profile you want to log in and ip address refers to the ipaddress of the remote machine you can get this by doing ifconfig in the terminal of that machine)
On WINDOWS, one way is that you can install CYGWIN on your windows machine . The cygwin control is a kind of UNIX based terminal in which everyone can use the linux based commands like man , ls , grep , etc . on the cygwin console (though some commands are different) . There-on , it works like a terminal and allows you to set-up your SSH server using the same set of instructions as used above in windows.
Once the server is set up , you can use the scp command to transfer files . But before we go any further , let us understand about SCP . SCP is basically a short form for Secure Copy . As the name suggests , it is a way in which you can securely copy files across networks over SSH servers so that many people can access it on other networks .
SCP IN LINUX
Doing SCP in linux is extremely easy thing, this was also done as a part of our mid-sem examination so for the beginners here’s a walkthrough…:
1. Open terminal on your machine .
2. Then type in the following easy command :
scp (full path of the file starting from the root directory) username @ipaddress and you will be prompted for a password …enter the password and the transfer status will appear on your screen)
SCP In WINDOWS
You can do this by a simple and easy to use sotware called winSCP and is very easily available online.
Here’s a tutorial for winSCP
***this can be used both for ssh and scp so do not get confused with what is written on another blog…
1. Run the winSCP application…following window would appear…this is to basically create a session through which we can run scp
(if the following window doesn’t appear then you must have installed PuTTy which has stored sessions for transmission)


 1.       Enter the required stuff in the above window and hit enter


 Don’t mess  up with the above settings …these are kind-of default settings
1    2.      After all this click on stored sessions and … you are done …:


Just hit login and you will access into the other pc


I am not going to discuss PuTTY  here…as already , a  few of my classmates have written and explained about it…and I don’t want to indulge myself in PLAGIARISM 
Here’s another software called copSSH    which is like doing  open SSH in windows
Its extremely easy to use
 (WARNING: while installing you would be prompted for a username and a password  …enter the administrator’s password and  username else in all other cases it’ll create a new user directory)
Rest all is easy … go on entering the required passwords and usernames and your connection will be setup…
After that start PuTTy and do all the required steps ...as explained in  other blogs…
Our blog doesn’t give a full technical explanation of all the stuff this is because we are the last one’s to explain SFTP and after seeing all those blogs, we made our blog based on what softwares are not covered and what mistakes have been committed in those blogs
Also, the blog is devoid of any visuals… I am extremely sorry for that, this is because my PICASA got screwed up and I couldn’t take any screenshots (and I don’t  know any other software)
And the visuals online were very confusing so…
if there’s any mistake , error or confusion  in our blog , we are happy to accept and sort the problem…
thanks a lot  for reading this…


Links referred:

Posted by:
Avi Kathpalia(2011034)
Siddharth Kundal( 2011111)