Done by Ramon Bhadauria and Sauhard Gupta
It is only through working on such projects that you realize how stupid you've been.
It might have been partially due to the lack of many other appealing topics that we went for this topic; but we now realize how unknowingly incredulous our choice was.
Backing up data is an essential and regular part of our experience with computers.
Backing up data means, as the name suggests, creating backup copies of data on our computer for an uncalled instance of any form of memory corruption, be it through a computer crash, HDD failure, viruses/worms through a Shikhar Singhal flash drive, etc.
It can help recover data in an event of data loss, and maintains integrity of data in certain cases.
It is, I believe, needless to emphasize how valuable data can be nowadays.
Setting up a Data Backup is extremely easy, as we shall go on to explain, and requires no effort as such from the user once everything has been properly set up. All the processes can be scheduled to run in the background at regular intervals of time, saving you unnecessary bother.
Backing up data needs you to have an external memory (USB Flash Drive/CDs/DVDs/portable Hard Drives/anything else) to back up the data on; even though certain softwares (like DELL DataSafe Backup) now offer users the choice of maintaining backups online (which can even be done on a remote machine) or on a specially created separate segment of your Hard Drive (though this is likely to be corrupted too in case of most data failures).
So what we do now is to divide our project into 2 parts:
1. Linux
There are large many reasons why I love Linux, and the ease with which it gets things done is one of them. Backing up in Linux can be done in one of two easy ways. You either use a GUI based utility, or you can create a duplicate copy of your drive using rsync.
The utility I used for Linux was Simple Backup Suite.
Simple Backup Suite is a freeware on Ubuntu, which can easily be obtained either from the Ubuntu Software Centre or through the apt-get command.
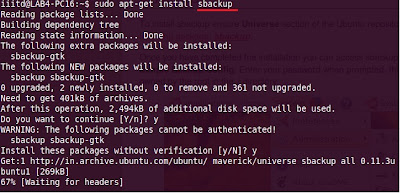
Once the application is installed, your terminal should look like this:

Attach an external data storage device and access Simple Backup Suite. Use the interface to decide the frequency and timings of backing up data.


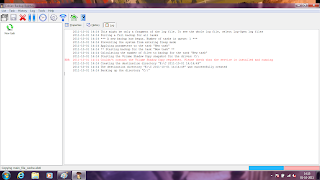
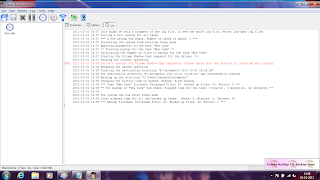
While your backup is in progress, your terminal should look like this (look, top-right):

Congratulations! You just successfully backed up your data. ( I received errors due to file permissions, which, if you're the root user, should not be much hassle)

This whole ordeal can also be performed by using rsync and cron.

(Image: rsync logo : wikipedia)
If I may quote Wikipedia, "rsync is a software application and network protocol for Unix, Linux and Windows systems which synchronizes files and directories from one location to another while minimizing data transfer using Delta Encoding when appropriate. An important feature of rsync not found in most similar programs/protocols is that the mirroring takes place with only one transmission in each direction. rsync can copy or display directory-content and copied files optionally using compression and recursion."
Confusing much?
In simpler words, what rsync does, is, create a duplicate copy of your specified folder and compare it with the created backup folder, realize the changes and implement them at the destination. rsync is, I believe, surprisingly easy and fun. Just try going through the man page, once. Here, I'll give you the command I used:

In all probability, you hate me right now. but lets take a look, the easy way:
1. the tag 'a' means archive. What it does, is, copy everything recursively, while preserving permissions, ownerships and all related stuff. The tag 'v' means verbose. It tells you what it is doing, in the terminal, or the log file in this case.
2. --progress gives you more detailed information about the works.
3. --delete compares the source folder with the destination folder and deletes any file at the destination, which you have deleted at the source.
4. --log-file command defines the creation of a log file to store what 'v' has to say .
5. /home/iiitd/log_folder is where you want to save your log files. you can even change it to the desktop, or your destination folder(which may be more logical).
6. date is the Unix command for system date and time. date + %y%m%d command is having the log file's name as the current date, followed by _rsync and a .log extension .
7.--exclude command tells rsync which directory to skip. more on why I did this, in the next step .
8. "/home/iiitd/.gvfs" was my greatest pain (trauma). Try excluding the exclude command for this file, and you get a nasty error because you do not have privileges, even with the sudo command. I'll let you help yourself with the wikipedia article : http://en.wikipedia.org/wiki/Gvfs. Apparently, " .gvfs is a virtual file system for the gnome desktop" and cannot be copied. I confess, that I needed help with this little bit. However, you don't really need this in your backup, in any case .
9. /home is the folder you want to create a backup of. In my case, I backup only the home folder, for representative purposes only .
10. /media/88AC-790F/backupfolder is where you want your backup. If you know your Linux file systems well, you know that /media is where your external storage device gets mounted. In my case, it was named 88AC-790F (this is the actual name for Linux purposes, of the flash drive I was using. I suggest that you check the name of yours). /backupfolder is the folder in the external device where you store your backed-up data.
Was it that hard ?
So, what we do know is, save the command as a shell file. Change the permissions (okey, there's no way, I'm going to explain to you this stuff.)(oh wait, you have my grade, so I'll say : chmod 755). Use cron to schedule this script.

Just do it at a time which is more suiting to your system. Because mine never stops running, I can, as well, do it at 4 AM.
/* I talked to Sriram about the gvfs part. He says that its the virtual file system, when you are remotely accessing your machine in the graphics mode. This involves the HAL(Hardware Abstraction Layer), which lies above the device drivers and below the kernels. What rsync does is, change the HAL, which in effect, tries to change the kernel, which is not permitted, even with the sudo permissions.
On this, I rely on his knowledge and much vast experience with Linux machines. Thanks, mate */
/* something really important that I forgot to mention, if someone read the post and didn't point out, that is really sad. In my cron table, I am scheduling /root/rsync-shell.sh. Isn't that a bit peculiar ? Well, the fun part is, rsync will not be able to backup all files , or delete any, without root privileges. You can use sudo permissions, but then, you'll need to be present at the system to type the password, which should be very much unlikely. Tricky ? well, not much. The easier bit out of it is, type : sudo cp /root . What happens here ? rsync abodes in the /root folder, and its processes stem from /root. ???? Success */
/* something really important that I forgot to mention, if someone read the post and didn't point out, that is really sad. In my cron table, I am scheduling /root/rsync-shell.sh. Isn't that a bit peculiar ? Well, the fun part is, rsync will not be able to backup all files , or delete any, without root privileges. You can use sudo permissions, but then, you'll need to be present at the system to type the password, which should be very much unlikely. Tricky ? well, not much. The easier bit out of it is, type : sudo cp
2. Windows
Windows, well known for its extremely easy to use GUI, has an even easier process for backing up your data. You can chose between either using the default (preinstalled) Windows Backup Utility, or the software I have decided to use here - Cobian Backup (Version 10). Cobian Backup is an amazing software, with absolutely everything that a backup software should have. And yet for all the features that if offers, it's absolutely free! Note that I will be backing up the data on an external USB Flash Drive in both cases for this explanation.
I will start with the Windows Backup Utility.
Open Backup and Restore from your Control Panel, and click on the button saying "Back up now" towards the right of the panel showing the details of your attached external Flash Drive. You will now have opened the Windows Backup Interface.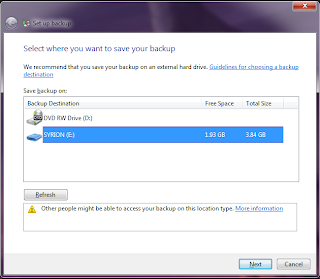
Select the external drive you want to create the back up on, and click on Next. You will now have a screen allowing you to review your backup settings.
Click on Change Schedule.
A newly opened window will ask you the frequency and timings of backing up of data.
Select the required timings and click OK.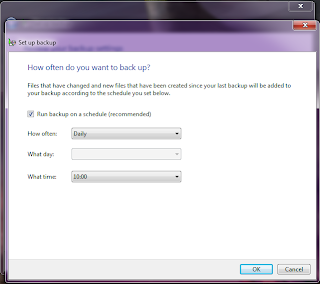
Click on the button saying "Save settings and run backup" when you're ready.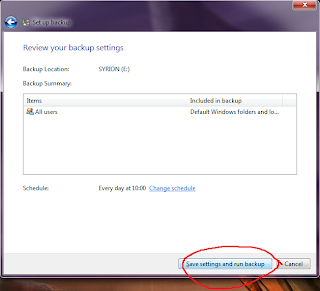
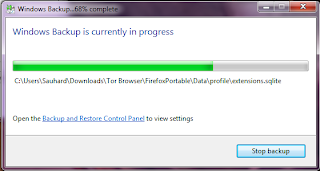
Your data should now have started backing up.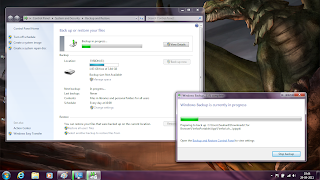

Click on close when the backup process is complete.
There, you now have your files backed up on your external drive.
To synchronize your backed up folder with the backup copy created, just have your external drive (containing the backup files) inserted and open the Backup Interface as before. Click on the button towards the bottom saying "Restore my files" and you're done. :)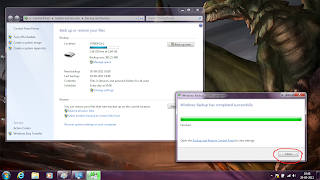
Easy, wasn't it? :D
Let's now move on to how to back up data using the Windows based software Utility - Cobian Backup 10.
Cobian Backup is a free software that can be downloaded from http://www.educ.umu.se/~cobian/cobianbackup.htm .
Download, install and run the application (it auto-runs each time if you chose to install it as a service or as under the specified options).
Right-click on the Cobian icon on your taskbar and click on open.
Now, to back up your data, click on New Task from the Task drop-down menu from the menu-bar.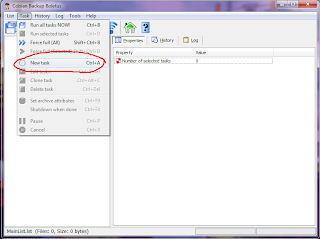
A newly opened sub-window will contain all the details/description of the backup.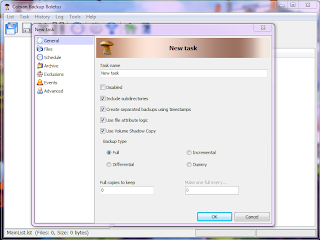
Click on the Files tab on the left-handside bar. Specify the required folders that you want to backup under the source section by clicking on Add and selecting the required directories. I selected C: to be backed up. Also select the target as your external drive to backup your data into it.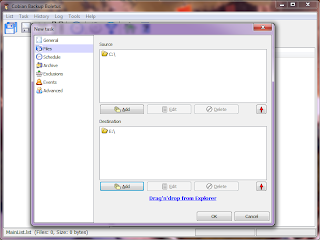
Now click on the Schedule tab on the left-handside bar. Select your schedule according to your requirements. I will chose to run the backup just once for demonstrating purposes. I am setting a run-time only a few minutes ahead of current time.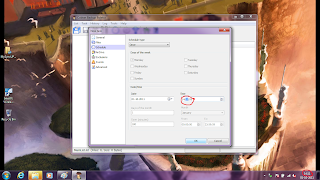
After making necessary changed (if any) to any other section from the left-handside tab (no explanation required here), click OK. You will now have created a task to run a backup process on the scheduled time.
To run the 'task' immediately, click on Force Full (All) from the Task menu (this will run ALL your backup processes, so be wary if you have other backup tasks created).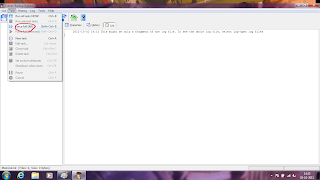
Cobian will now run the created backup task.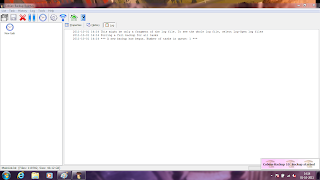
You can keep track of the net progress of the entire task(s) looking at the red bar on the bottom-right corner of your screen;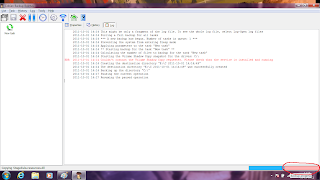
and the current operation progress on the blue bar just left of the red bar: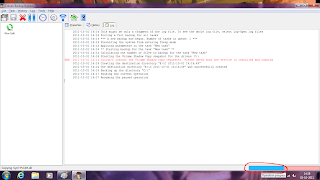
Note- Cobian essentially also selects all the system files and folders including the OS related files etc. In certain system folders containing system process files, the software might prompt an error due to it being unable to access the process files that correspond to currently running system processes. Though this can be ignored, it can ideally be avoided by partitioning your hard disk into atleast 2 segments: 1 for all the System/OS related files, and the other(s) for user files. This way you can back up all partitions except the system partition, or alternatively by manually specifying all the folders that you want to backup (though this can be a tedious process if you have a lot of data to be backed up).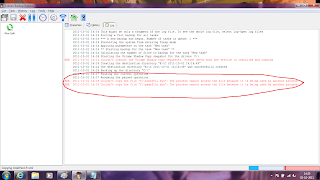
I am now terminating the currently running Backup of my C: drive, because it is not possible to backup the entire 50GB+ contents of my HDD into a single Flash Drive.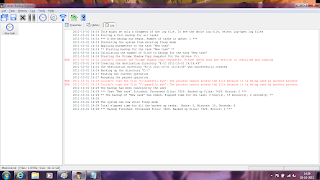
For further explanatory purposes, I'll now create and run a task to selectively backup a certain folder (say, My Documents) onto my Flash Drive.
Repeating the process as before...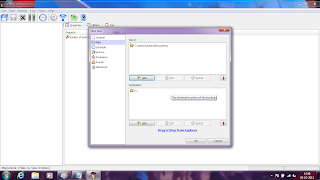

The task is now underway.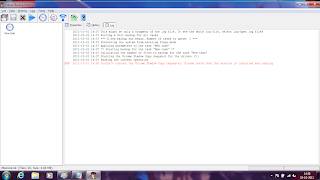
Backing up is finished!
Postscript : While you're backing up your data on an external drive, just make sure that its connected/mounted.
Thanks goes to Professor Amarjeet for letting us work on this topic and supporting our whims about using certain wares; Shikhar Singhal for his hard drive and other support; Charupriya Sharma, Ankit Kumar and Rudresh Pande for their flash drives; Ramjot Singh for his invaluable help; Special thanks to Sriram "Dexter" for great help and explanations with the tricky gvfs part; Wikipedia and Google for obvious reasons; Linux basement for help on my shell script.
--Ramon Bhadauria ; Sauhard Gupta
No comments:
Post a Comment