BACKING UP DATA
As usual surfing on the internet today, searching for some music and videos. Suddenly saw a good looking link for one of my favourite songs. Let’s download it.
Click!
Oh! …What happened? Why does this box shut down? Shit!
Restart
……
Now why is it not starting again?
Hey! Friend just take a look at this box, it’s not working
F- Hmm….
F- Oh God, sorry buddy your OS is corrupted.
What! My files, my videos, my songs, all my data gone just in a click. Oh no!
F- Don’t worry, restore them through the backup of your drives.
What backup drives, what backup? I don’t keep any backup or such thing. What is it?
F- So I have to tell you everything. Ok! Take a look at this.
Backing up is making the copy or copies of the data which may be used to restore the original data after a data loss event takes place. Usually the main purpose for backing up is to recover data after its loss, whether it is by data deletion or corruption.
Data loss is a very common experience of computer users. 67% of internet users have suffered serious data loss. It can also be used to recover data from an earlier time, according to the need of the user.
In this modern era, there are many different types of data storage devices that can be used to make backups. These devices can be different in terms of geographic redundancy, data security and portability (need to backup many machines), capacity (more capacity needed to store more data), speed (slow speed of copying is nowadays irritating, so no one would use a Zip disk or a floppy for such thing), cost (the pocket is need to be seen for a good media).
Now let’s take a look at what data to backup.
>> Files and Folders: Includes documents, emails, financial data, downloaded music, videos -anything that is created, recorded or received that has meaning and importance to the user.
>> System Settings: Many people never touch their system settings -- the settings are created during OS installation and stay that way. For those people, backing up system settings is less crucial than backing up their personal settings, since a re-installation would fix things. For people who customize their systems, backing up these settings can be at least as important as backing up personal settings.
>> User Settings: Includes changes you've made to personal settings: desktop configuration (e.g. colors, backgrounds, screen resolution, mouse settings) and program options, such as settings for Office, music player, email program, etc.
>> Softwares and etc, etc.: Includes installed system software and application software (such as Office, Firefox, Google chrome, media player ). Such software can usually be restored by reinstalling, but not always.
Now we have the answer of >> Why to backup the data? >> What data to backup?
Let’s move on to main thing i.e. How to backup the data?
-------------------------For LINUX-----------------------
Using Rsync -- In Linux the data, files from a directory/folder can be copied to a remote server with the help of a simple (not so simple) command called ‘Rsync’. Rsync is a fast and extraordinary versatile file copying tool which can copy locally to/from another host over any remote shell or to/from a remote Rsync daemon.
First of all install the rsync by typing the following command in the terminal:
# sudo apt-get install rsync

Now to copy files from the PC to a remote server use the following command:
>>> rsync -v -e ssh <file path> <username>@<remote server name>:~
#### symbol ~ indicate the users home directory(/home/….)
To run this backup time to time one can make a shell script with the rsync and start a crontab to run it. Let’s see......
Shell script - backup.sh saved in the home folder
#! /bin/bash
rsync –v -e ssh <filepath> <username>@<remote server>:~
……………………………………………………………………………………………………………..
Now in terminal:
crontab –e
# # # # # /home/backup.sh #s is to enter minutes, hours, date, month, day (when to run the backup automatically)
Press ctrl+0 to save the command.
Press ctrl+ x to exit.
Using software – The software we are going to use is ‘sbackup’
Install the sbackup through sudo apt-get install sbackup
Now open the Simple Backup Config from the applications and enter your root password to enter the application.
Once it opens the sbackup application a dialog box opens where you can configure your backup settings first tab is general options. Let select “Use custom backup settings” from one of the 3 methods.
· Recommended Backup--This would perform a daily backup of the /home and data held in /etc, /usr/local, /var by default this backup will be stored in /var/backup.
· Custom Backup— It is same as recommended backup but we can change the settings, schedule time and included files in it.
· Manual Backup— It backups some files time to time according to the demands of the user.
For other options in it:
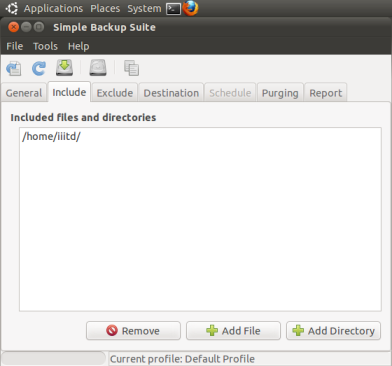
- Include> Here you can include any file or directory you want to backup
- Exclude> Here you can exclude files and folders you don’t want to backup

- Destination> Here you can change the backup store location from the default /var/backup. You can also backup your data on a remote machine through it (using the ‘Use a remote directory’ option and entering the ‘ssh’ command as shown.)


- Schedule> Here you can schedule the backup(minute-wise ,hour-wise, weekly, monthly, day-wise) when to run.

- Purging> Here you can select old and incomplete backups and set the no. of days to purge.

Press save and press Backup Now! if you want to backup at that time. The backup will run with a process id.
ü You can also restore your data using sbackup. To do so open ‘Simple Backup Restore’ from ‘Applications’.

Here you can select the restore source folder source and available backups from drop-down menu and choose files and folders to restore.
So, here we end with two ways of backuping and restoring the data in Linux. Now it is your choice which method you would like to use.
-----------------------For Windows------------------------
It is a bit easy for making a backup for windows.
Ø Direct through media or in any drive — Be ready with your DVD/USB and plug it in. Open the ‘Backup and Restore’ from your control panel and then click on the ‘Backup now’ button to start the backup activities and store it in the media you want.

You can also change the settings for destination, files to backup, schedule, etc. from the ‘Change settings’ option below.
You can also restore your files from here as you can see its option below.
Choose your files to restore.

Choose your destination to restore the files.

Ø By software— Now we are going to use a software ‘Oops!Backup’ to do the same thing.
Download the software setup and install it.
Open the setup wizard to see the following dialog box:
Choose the new users option and click next and go through the steps involved in making backup.

Now perform all the steps 1,2,3 to choose the files to backup, choose the destination (drive) and the schedule time to run it.


Start it and see your data backuping.

Now the following screen would appear that shows the status of the drive of you have chosen to add files to.
This also shows the time of the backup run last time and space used by the files back upped.

So this was the end for the Windows too and also to this information for the backup.
Hope for the safety for your precious files and folders.
---- By Brijesh K. Garg and Ashrut Bhatia
No comments:
Post a Comment